A clogged 3D printer extruder nozzle is one of the most common problems you are likely to experience, either as a hobbyist or a professional. That’s why one of the first maintenance skills you have to pick up is how to clean a 3D printer nozzle effectively.
There are many reasons why the hotend of your 3D printer gets clogged including incorrect printing temperatures, getting the nozzle too close to the bed, poor quality filament, among others. It would be even better if you could avoid getting the nozzle clogged in the first place, but cleaning a 3D printer extruder nozzle is easy enough when it does happen.
If you’re just
getting started with 3D printing
Trusted Source
Getting Started With 3D Printing
- Instructables
The big day has arrived, you came in for your reservation and now it’s time to do some 3D printing! This tutorial will help you get going as fast as possible.
www.instructables.com
, make sure that you are fully conversant with your 3D printer before actually printing anything. Read your user guide thoroughly and be aware of all the maintenance procedures. For now, let’s get that nozzle clear and printing again.
One classic sign of a clogged nozzle is under-extrusion, but there could be other reasons for it as well. These include a faulty heating block, a material break at the print head, a too low or high printing temperature, faulty material feeder, among others. Thus, you shouldn’t be too quick to chalk up printing problems to a clogged nozzle.
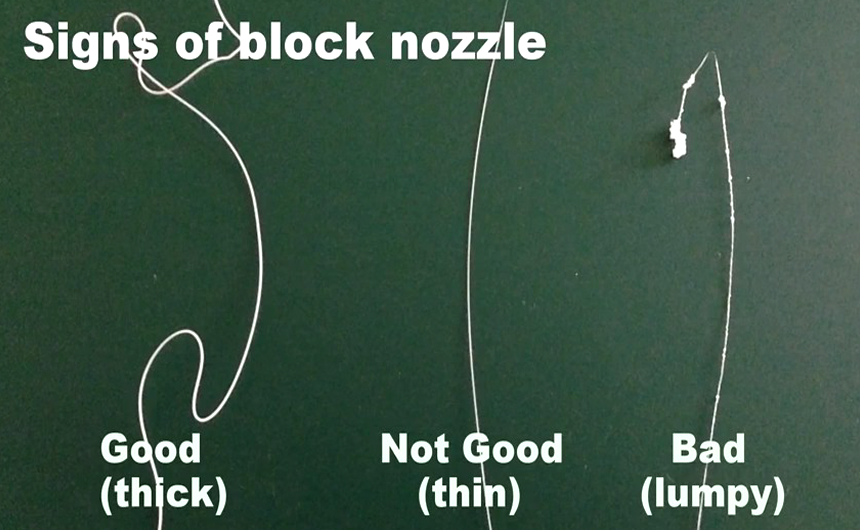
It’s pretty easy to tell if the extruder nozzle on your 3D printer is clogged. You can check by disengaging the extruder gear lever and pushing the filament through by hand. If it curls, has trouble slipping through, or simply won’t pass, you have a blockage.
There are other signs of partial blockage you can look out for to know when clogging is starting to take place.
The frequency of cleaning a 3D printer nozzle varies depending on usage. However, there are times when you should clean it out whether it’s actually blocked or not.
A lot of these problems can be alleviated by getting a high-quality 3D printer in the first place. In our review of 3D printers under $2000, our tops pics ensure even heating and printing, dust control, and various anti-clog features.
There are many ways to clear clogs and blockages in your printer’s extruder nozzle. However, some of them are not recommended because they may result in damage to your 3D printer.
Each of these methods has its place, so let’s get to the details.
Full or partial clogs in your 3D printer’s nozzle are easily cleared up in various ways. What happens is that excess or unmelted filament material builds up inside the nozzle. In theory, you could break up this material and force it out with a foreign object or melt it completely so that it flows out.
Using a nylon filament is one way to clean a clogged 3D printer nozzle. This method works best with partial clogs because you have to be able to pull the cleaning filament through.
The cleaning filament itself is a non-abrasive compound, usually, nylon or HDPE used to clear hard-stuck residues in industrial applications. A whole roll of it can be expensive, but you can pick up 50g of cleaning filament cheaply which can get you through up to 100 nozzle purges.
To clean your 3D printer nozzle with a cleaning filament, here’s what you need to do.
We don’t recommend playing around with sharp needles, neither do we recommend this method in the first place. That being said, you can use an acupuncture needle, hypodermic needle, sewing needle or any other kind of needle slim enough to get through the nozzle.
This method is usually reserved for stubborn full clogs to make way for a cleaning filament. The idea isn’t to remove the clogging material, but just to break it up sufficiently that it comes out using other methods.
Be aware that the metal needle can easily damage the extruder nozzle. You can also injure yourself easily with the needle or burning your hands on the hot nozzle.
A metal wire brush with brass or copper bristles is one of the most convenient ways of cleaning a 3D printer nozzle. The metal bristles reach inside the nozzle to clean out leftover material.
A wire brush is an appropriate tool to use when changing the filament to make sure that you remove the remainders of the last type of filament used. You use it by brushing the nozzle and area around it gently after preheating the nozzle at the last printing temperature used.
However, you need to remember that the wire brush only cleans the tip of the nozzle. It won’t clean internal clogs, but it makes an important first step for cleaning the extruder nozzle. Just make sure that the nozzle won’t be damaged by the wire brush, and stay away from steel wire brushes.
The most stubborn clogs, especially when you’re using ABS or nylon, can be particularly hard to clear out. In this case, You can remove the nozzle and use a blowtorch or hot air gun to melt the clog. However, you need to be careful because these hot devices can actually melt the nozzle itself.
Once in a while, you might need to deep clean your printer nozzle to get it back to prime printing condition. This is especially necessary when you have been experiencing uneven print quality.
Deep cleaning a printer nozzle will usually require you to remove it from the extruder first so that you can access the inside. To do that:
Once you have your nozzle out, simply place it into a container of acetone and leaving it in for about 3 hours. The acetone will dissolve the ABS or other filament material and clean out the nozzle of all dirt. You can also break up any stubborn remains mechanically.
Once the nozzle is nice and clean, you need to screw it back in. First, heat it up to 2500C before screwing it back to make sure it remains tight even when hot. This is also your chance to replace the extruder nozzle if it is damaged or worn – you should typically change it every 3 months or so.
Some of the best replacement nozzles for a 3D printer are these Luter extruder nozzles. The 24-pack box comes with different nozzle sizes ranging from 0.2mm to 1.0mm, all of heavy-duty quality and compatible with all 1.75 PLA and ABS printers.
It’s easy enough to learn how to clean the nozzle on a CR-10 3D printer, but the process is a nuisance and can take some time. It’s much better to avoid clogs as much as possible in the first place.
There are several solutions to minimize 3D printer nozzle clogging, and here are the best of them.
The quality of your printer also matters. Some printers have uneven heating, which causes all kinds of problems at the printer’s hotend. If you suspect that this is the issue, consider upgrading with one of these top 3D printers under 1000.
A clogged 3D printer nozzle is one of those problems that are simply universal, just like heartbreak. Fortunately, even a complete clog is simple enough to clear once you know what you’re doing.
There are different methods on how to clean a 3D printer nozzle. Some of them are easy and straightforward, especially when pulling a clog using a cleaning filament. Others, like deep cleaning with acetone, take some time and patience to accomplish.
The best way to deal with clogs in your 3D extruder nozzle is to avoid them altogether. Hopefully, this guide has equipped you enough to deal with a clogged extruder nozzle successfully with minimum risk of damage or injury.