One of the things that don’t come easy when learning 3D printing Trusted Source 3D printing - Wikipedia 3D printing, or additive manufacturing, is the construction of a three-dimensional object from a CAD model or a digital 3D model. The term “3D printing” can refer to a variety of processes in which material is deposited, joined or solidified under computer control to create a three-dimensional object, with material being added together (such as plastics, liquids or powder grains being fused together), typically layer by layer. en.wikipedia.org is calibrating the motors accurately. 3D printers use stepper motors. They rotate by making small steps to move the extruder or axes to some distance. For you to calibrate the printer, you must understand the relationship between steps and distance.
As much as knowing how to calibrate a 3D printer sounds like such a big deal, it gets easier with time. The settings are usually repetitive, and so you only need to master calibrating one motor then the rest would follow suit. As a serious user, you must learn how 3D printer calibration works. The overall knowledge will help you achieve different results and solutions as a lot of things depend on the setting. Plus, you can only exploit the full potential of your 3D printer if you know everything about it.
Just like any other mechanical product with moving parts, calibrating a 3D printer is crucial as it ensures consistent accuracy. Without accuracy, your designs will be completely useless.
You don’t need much to calibrate a 3D printer. The must-have items include:
Here is a step by step guide on how to calibrate your machine.
To get the best final print, a good first layer really matters. You must ensure that your nozzle is neither too far nor too close to the bed. If it is too close, you will have a first layer that is squished and possibly destroyed. This will force you to cancel your print. If the nozzle is too far, your print will not have adhesion which is likely to make it fail.
Luckily, you won’t have much work to do with this setting. Most 3D printers allow you to set a value directly in the settings.
All you have to do is fine-tune the Z offset. This will help your first layer to stick properly to the bed. The Z offset, basically tells your printer how far to move the Z axis from the Z endstops. When you notice your nozzle digging into the bed then you should increase the Z-offset. If it is peeling up from the bed, then you should lower the Z offset.
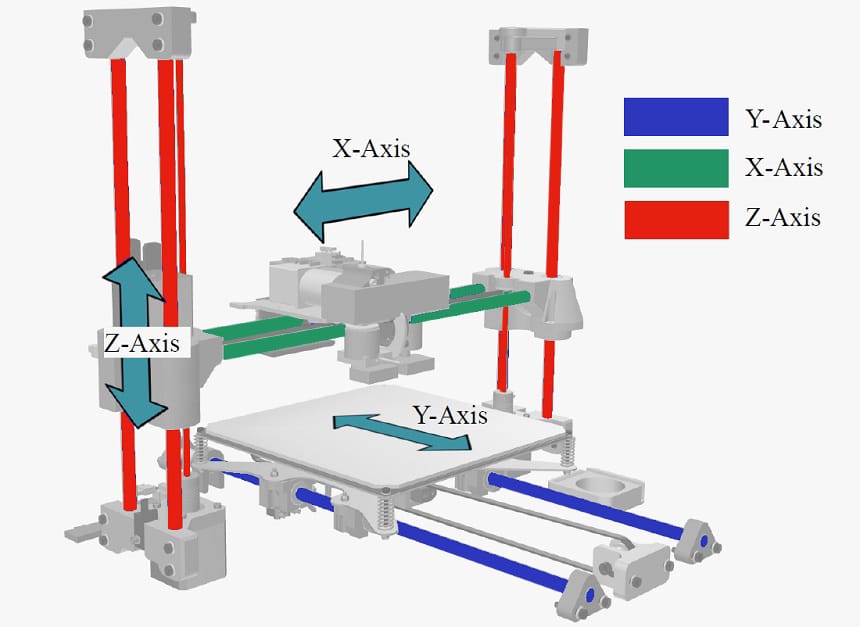
This is what guides the axes and extruders to move a certain distance. It plays a crucial role in achieving accurate results. Essentially, the stepper motor is the basis of the relationship between the steps made and distance covered. It happens in a few steps including:
The first thing to do is calibrate the extruder. You must always ensure that the extruder is depositing the right amount of filament. However, first things first: you need to retrieve your current 3D printer’s settings. You can do this by sending the command M503 to the printer.
The first 3 parts of the output you receive from this command indicate the number of steps taken by the stepper motors per unit. The value may not be handy at the moment but take note of it as you will need it later.
Part of the output should be something like M92 X100.00 Y100.00 Z400.00 E140.00. The first 3 values are the number of steps the stepper motor makes every one mm in the X, Y, and Z directions respectively. You can call these values A for later use.
What really does matter at the moment is the last value of the output. It determines the number of steps taken by the extruder when every mm of the filament is extruded from the nozzle.
Begin the process by feeding a small amount of filament then marking the extruder correctly. You can make a mark of about 50mm on top of the extruder. You can call this value B. Extrude 10mm of filament then again take note of the distance between the point marked on the extruder and that of the last marked point. You can call this value C.
Subtract the value of the point marked on the extruder from the currently marked value (B-C) to get the amount of filament extruded. If the difference turns out to be 10mm then you won’t have to calibrate the extruder because it’s already calibrated but if it’s less or more, you have to calibrate.
Also, you need to compute the new number of steps taken per mm for the extruder. Let’s call this value D. D = 10*A/ (B-C). To get the most precise results repeat the process for measuring D for about 3 times then get the average of the results.
For you to calibrate the extruder, you must tell the printer the new value. You can do this by sending the command M92E (D) to the printer. This command will only tell the printer the value, but won’t save it. To save it, send the command M500.
For example, assuming that before the test extrusion you measured the distance between the top of the extrusion and last marked point to be 53.10mm and after the test extrusion you measure it to be 42.80mm, then your B-C=10.30mm. If the extruder’s original number of steps per mm was 140, then you will send then you would send the command M92 E135.92 as 10*140/10.30= 135.92.
In such a case, you shouldn’t expect your results to be perfect when you calibrate the axes. A variation will occur, but provided you have confirmed that your calibration is correct there shouldn’t be a problem. Just ensure that you are pretty close to the desired value in terms of percentage for your printer to be well-calibrated.
Calibrating the axes is just as important as calibrating the extruder. In fact, the procedure is quite similar, only, you have to print out something. You can use a pre-existing model or design one yourself in the CAD software of your choice.
After you have printed the model, take its measurements to get the dimensions of each of its axis. With the accurate measurements for each axis, repeat the computation you did for the extruder, except, replace the difference in the extruder by the measurement. Also, replace the number 10 by your target value. The first measurements of the 3D printer’s output string must also be replaced by the first 3 values of the string. Next send the M92 command to your printer then the M500 command to save it.
Here is a clear illustration on how to measure the X-axis: first, start by homing your X-axis and removing the Z-axis out of the way. Grab your tape and place it on the rinterbed. Ensure you lay it parallel to another point of the printer that wouldn’t move when you move the X-axis.
Tell your printer to move the X-axis in repetier. If you are using the 100 x 100 x 100mm printbed move at least 70mm. You will have less margin for errors if you move it further. However, be careful not to go too far and push your printer beyond its capabilities. Grab another piece of less flexible tape and place it at the same marker point you used before moving the X-axis. This should be 70mm. At least it’s what your printer thinks.
Next, use your digital calipers to get the true measurement for the X-axis. If you get a perfect 70mm, then your X-axis is calibrated. If you get something more or less, take note of it and move to the next step.
To calibrate the X-axis, you need 3 variables: the 2 measurements you just took and the current M92 value for X. These 3 variables will help you get a new M92 value. The formula for the New M92 value is Desired Movement/Actual Movement*Current M92 value. Our desired movement is 70mm. Assuming you got an actual measurement of 70.87mm then your New M92 value should be 70mm/70.87mm*135.92 = 134.35.
To input your new M92 value type in the G-code M92 X134.25 then press enter. To save your changed settings type in M500 then press enter. To ensure the new M92 for X has been saved, type in M501 then scroll up your log.
Since the process is very similar to calibrating an extruder it shouldn’t take as much time. You can master calibrating axes when you repeat the process for a couple of times.
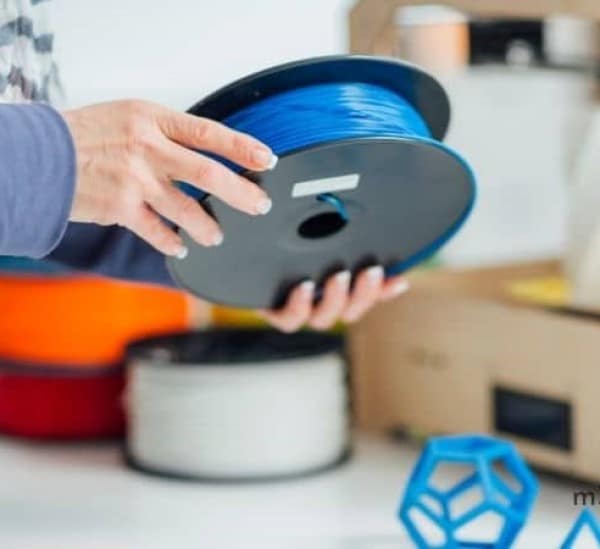
Filaments are different. They all have varying properties. Every roll, whether made from the same material in a similar color is unique. The TECBEARS PLA 3D Printer Filament is the most popular filament. It is a top preference for many because it offers high purity with low shrinkage. It also offers superb layer bonding that can meet all of your demands for various printing projects.
You have to fine-tune your filament settings for you to get the best prints. Not that you can’t get good prints when you use the settings recommended by the manufacturer, fine tuning just gives you the very best results.
Here are the fine-tuning steps to follow once you open a new roll of filament:
Get a pair a calipers and measure the true diameter of the filament. You will find that the measurement differs from that provided by the manufacturer up to a certain percentage. Take the measurements at least 3 times on 3 different points of the spool then obtain their average. The result you get is the diameter of the filament. Enter it in your slicer. Remember, getting this figure correctly is necessary for ensuring your printer extrudes the right amount of filament.
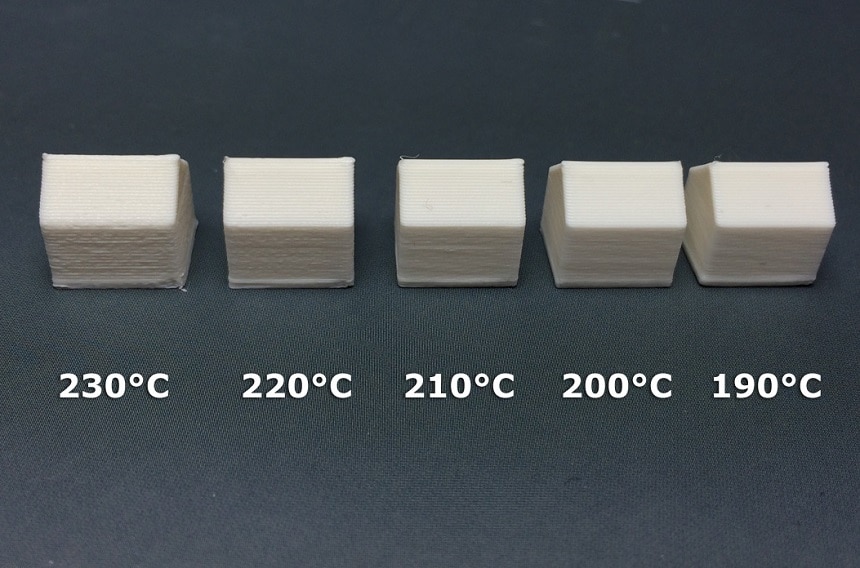
You can achieve this by printing a temperature tower. You can get one from the myriad options available online. They all share the same idea. They are all segmented into blocks at different heights. Every block should be printed at a different temperature. You can determine the best temperature to print your material by analyzing the blocks after printing.
Printing a temperature tower isn’t a walk in the park. You will have to put in some work. Some slicers don’t allow printing at different temperatures and heights. If yours is a similar case, you will have to edit your G-code manually before printing it, and it usually involves inserting the G-code commands to set the temperature of the extruder.
Here’s what to do to get the correct print temperature:
First off, establish the height of each block. You can name the values H, so that you have something like 0, H, 2H, 3H and so forth. Pick the editor of your choice then open your G-code file in it. Look for commands that instruct your printer on how to move. The commands begin with G1 and your G-code file has got lots of them in the format G1 Z (H).
The codes may also contain the X and Y movements. Once you have found the G1 Z (H) command, add the command M104S (T). T represents the temperature of the block that begins at height H.
Here is a quick illustration:
Suppose the blocks have heights of 1cm and the temperatures range from 185 degrees Celsius to 220 degrees Celsius then you should look for the first command that contains G1 Z10 as it is the one that brings the hot end to a height of 10mm. Once you have found the line, set its hot end to 190 degrees Celsius by inserting the line MS104 S190 immediately before it.
Repeat the same procedure for all the blocks then print the updated G-code file. Once the temperature tower is printed, you can analyze the different blocks to determine the best temperature for printing your material.
All the crucial considerations on calibrating your printer’s settings have been covered but there are some other settings that you can also alter to improve your prints. Torture tests are a great way of getting an overview on whether your printer is good or bad at doing some things.
Perfecting torture tests does help with the common problematic areas like overhangs and bridges. They also come in handy in diagnosing certain problems. Using torture tests will also help you hone your 3D printing skills.
You can find plenty of torture tests by searching your STL site. They are different but most of them come with straightforward instructions on how to diagnose problematic areas and points of failure.
Whether you have a budget friendly 3D printer or a premium 3-in-1 model, it is important to know how to calibrate it. Calibrating your 3D printer is pretty technical and won’t be the easiest of tasks but once you wrap your head around it you’ll be breezing through the process. The first crucial step is gather everything you need then ensure you have the best 3D printer and software to control it. If you are a beginner looking to purchase one, check out FlashForge. It is incredibly pocket-friendly and it has a wide filament compatibility range.
Learning how to calibrate your printer is deemed the steepest learning curve, but with the help of useful settings like torture tests, you should be able to learn fast. They help with problematic areas like bridges and overhangs.